Know Your Techniques: Accuracy, Precision, and Using the Right Instrument
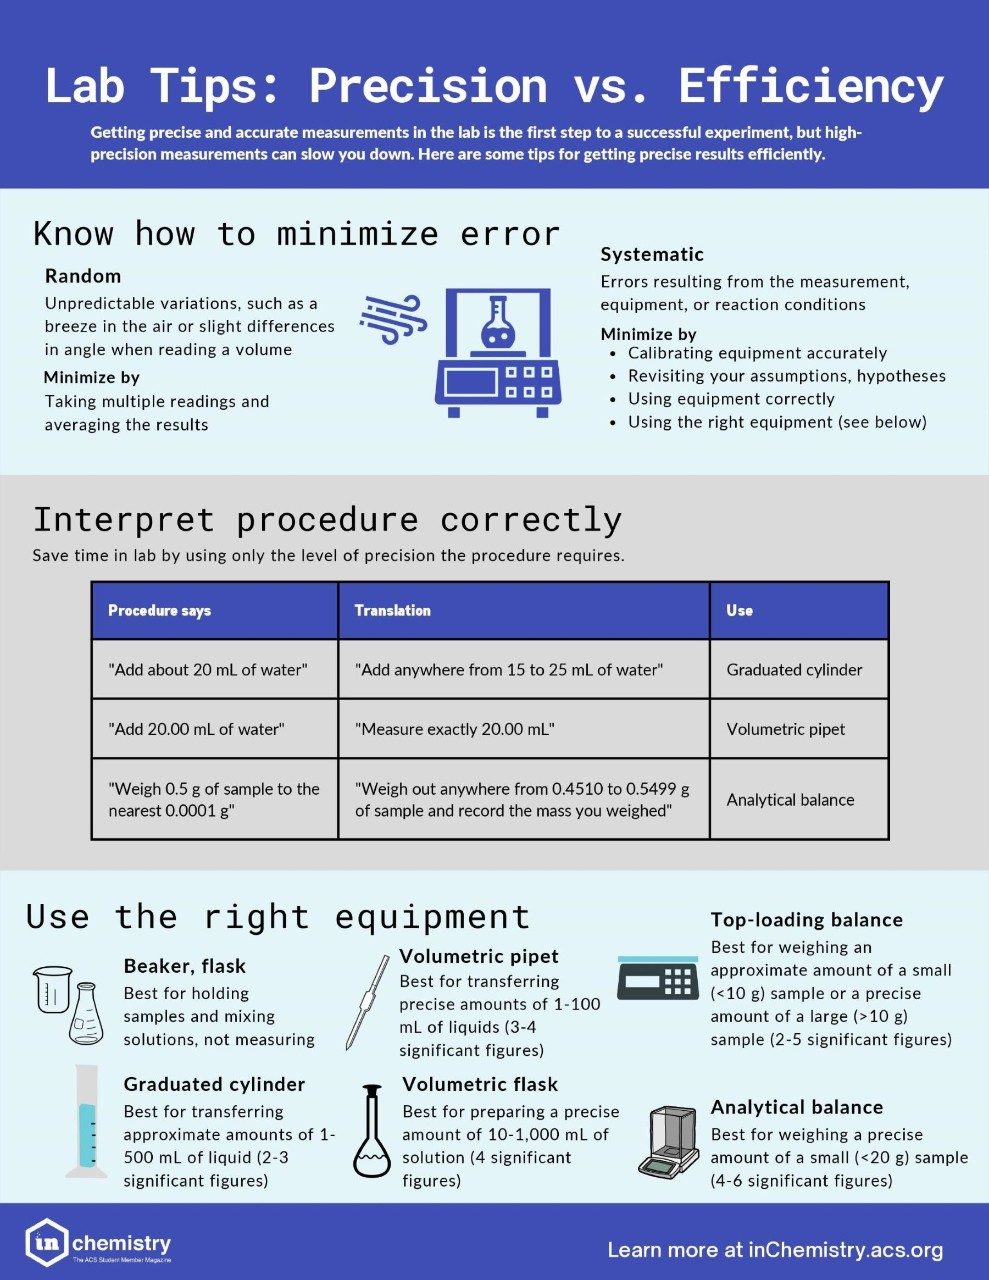
You’re in the lab and need to prepare a sample. Do you use a volumetric flask or an Erlenmeyer? The analytical balance or a top-loader? What about pipettes? Choosing the right equipment is the first step in a successful experiment. You need precise measurements at each step because small errors can add up quickly. But sometimes you don’t actually need the most accurate values, and spending a lot of time using more precise options might not provide any benefit.
How can you decide if (and when) accuracy and precision are worth the extra effort? How do you select the right measuring instrument? Read on to find out.
Understanding Accuracy and Precision
In experimentation, it’s important to remember what we mean by accuracy and precision. Accuracy is how close your value is to the true value. The problem is you can’t always know what the actual value is. If you’re in a lab for a chemistry course, chances are the instructor or TA knows the value you should get and can let you know how accurate you are. But for research projects, often you won’t know the value. In fact, you’re usually trying to find it.
This is where precision comes in. Precision is how reproducible your results are, or how close a set of measurements are to each other. If you measure the volume of a liquid multiple times with the same piece of glassware, do you get the same value each time? If you do, you know you’re being precise, even if you can’t determine your accuracy.
Striving for high precision ensures you’re doing your best to eliminate errors from measurements and calculations. The more precise you are, the better your chances are of getting an accurate result because high-precision equipment is usually calibrated to a high degree of accuracy. If you are struggling with precision, it is usually a sign that you are using the instrument incorrectly or there is a problem with the equipment itself.
It is possible to have precise measurements and still get the wrong result. Your hypothesis or calculations might be wrong, your equipment might need to be recalibrated, or your reagents might be contaminated. But for now, let’s focus just on precision.
Another way to achieve better precision (and therefore, hopefully, high accuracy) is to be able to report your values to a larger number of significant figures. Significant figures are all the digits in a measured or calculated value you know for certain, plus a final digit that contains some uncertainty. All measurements have an inherent amount of uncertainty, which is reflected in the number of digits you can report in a measured or calculated value.
For example, 800 mL beakers are marked to every 100 mL. You can know the hundreds place with high certainty, but you have to make your best guess at the tens place. Similarly, a 100 mL graduated cylinder is marked to every 1 mL. Therefore, you can know the ones place and higher values with certainty, but you have to make the best guess at the tens place.
Digital readouts are simpler: the more values given, the more precise your measurement is. A top-loading balance may only give you two decimal places in your mass reading, whereas an analytical balance may give you three or four decimal places. If your sample is more than 10 g, a top-loading balance will give you at least four significant figures. However, samples smaller than 1 g need to be measured on an analytical balance to get the same precision.
More significant figures mean higher precision, but do we always need to be very precise? Sometimes we need a very precise and accurate value, while other times close enough is good enough.
You need to consider why you are preparing the sample. Analytical work typically requires precision. A solution to use in a titration will probably require high accuracy, as you are using it to determine an unknown. If you’re making a solution you’re going to standardize later, you might just need to know the approximate concentration of the solution, since you’ll be determining the precise value later.
You can also look to your procedure to find out how precise you need to be. For example, does your procedure call for you to make a 1 M solution or a 1.00 M solution? A 1 M solution just needs to be around 1 M, whereas a 1.00 M solution would require much more precision in its preparation so you can more accurately know its concentration.
Balances: Top Loading versus Analytical
When you’re working with balances you may have the option of a top-loading balance or an analytical balance. Top-loading balances are good for larger samples but don’t give as many decimal values in your mass measurements, so you may not get as many significant figures in your reading. They are useful for mass measurements that don’t need to be precise and can be more approximate. An example is if you’re making a buffer or a saturated solution and need to add a mass within a wide range.
Analytical balances are best used for weighing small sample amounts where you need to know the mass with a higher accuracy. These types of balances tend to give more decimal places but can be overloaded with larger sample sizes. Analytical balances also tend to have draft shields on them because even an air draft can impact the mass reading.
In general, if you need to know a small mass (typically less than a gram) to the nearest 0.0001 g, use an analytical balance. If you need a less exact mass or have a large amount of material (> 10 g) use the top-loading balance.
Glassware
Choosing glassware to make a solution can be more daunting than choosing a balance. There are so many types, and they all have different purposes. Beakers and Erlenmeyer flasks have volume markings for reference but aren’t really meant for measuring. They are great for preparing or holding a solution while you are measuring out a more accurate amount. For example, if you are doing a titration several times, you might prepare a large amount of stock solution, pour some into a beaker, then pour solution from the beaker to the buret for a precise measurement. The exact amount in the beaker doesn’t matter because you are using the buret for precision.
If you want a very precise volume and are dealing with variable amounts, burets are a good choice. They are marked to every tenth place so you can get two decimal places in your volume measurements. Burets are commonly used in titrations because they give very accurate measurements.
You can also measure out smaller volumes precisely and accurately with a volumetric pipette or tiny volumes with a micropipette. Pipettes are sometimes called “transfer pipettes” because they are used to transfer a precise amount of liquid from one container to another. When used correctly, pipettes tend to have errors of +/- 0.1% of the volume they measure. They are even calibrated to account for the tiny amounts of fluid left behind when they are emptied.
Volumetric flasks are good for preparing a specific volume of solution. Typically, you will put a precise amount of solute into a volumetric flask and then dilute with your solvent to the etched mark to get a very accurate total volume. Note that unlike volumetric pipettes, volumetric flasks do not account for liquid that remains after you pour out the contents. If you need to measure out 10.00 mL of a solution for a reaction, you should use a 10.00 mL pipette instead of simply pouring out the contents of a 10.00 mL volumetric flask.
Other Equipment
A pH meter is a tricky instrument. Most pH meters only give 1–2 decimal places in their readings and because pH values are log functions, the decimals are the only significant figures in the value. (See Significant Figures Refresher box.) This is fine if you want to have a rough idea of the pH; however, if you need to determine the precise H+ concentration or a pKa value of a weak acid, you will need to do a titration using volumetric glassware.
When it comes to temperature readings, the type of thermometer you use can also determine the accuracy and precision of your reading. Analog thermometers, which you have to manually read, may not have many digits in them depending on how many markings they have (every one degree versus a tenth of a degree), whereas a digital thermometer may provide additional significant figures. This would allow for greater precision and accuracy in your temperature reading.
If you’re measuring the absorbance of a sample, the number of significant figures is determined by the spectrophotometer. This absorbance then can be used to calculate the concentration of an analyte in solution with Beer’s law, but the number of significant figures in your concentration is limited by the absorbance value’s significant figures.
Conclusion
Now you’re armed with the knowledge and tools needed to determine when accuracy and precision are important, and what equipment will best provide you with the information you need. Your time is valuable and sometimes you need to expend the extra effort to have the most precise measurements to get the most accurate values, but other times close enough is good enough.
Significant Figures Refresher
Significant figures are the primary way to indicate the precision of your work. Understanding them may seem daunting when you first start, but it gets easier as you use them. Here’s a refresher on the rules:
- Digits 1–9 are usually significant because they are obtained by measurement. There are three exceptions:
- Digits to the left of the decimal place in a logarithm are not significant because they indicate an order of magnitude.
- Digits in exact definitions are not relevant. For example, there are 100 cm in a meter, by definition. This value does not change no matter what is used to measure length.
- Counted numbers are also exact numbers and have no error associated with them, so they do not limit the number of significant figures in your reported value.
- Zeros are significant only in specific situations:
- Leading zeros are not significant, as they are placeholders. You might use a small graduated cylinder to measure 5.26 mL or 0.00526 L of solution, but you would still have three significant figures.
- Zeros in between significant figures are significant because they are part of the measurement.
- Zeros at the end of the number are only significant if they are part of the measurement. If you filled a 500 mL beaker to the line marked “200,” you can say you have 200 mL +/- 10 mL. So, that last zero cannot be verified, and you have two significant figures. Using scientific notation can clarify this: 2.0 x 10² has two significant figures.
- Addition and subtraction
- Your answer will have the same number of decimal places as the least precise measurement in the calculation. Performing addition and subtraction operations can result in gaining or losing significant figures in the final value (See the addition step of the example below). Consider filling a 1 L beaker half-full with water so that you have roughly 500 mL +/-50 mL. Now imagine pipetting in 1.00 mL. Do you really know your volume any more precisely?
- Multiplication and division
- Your answer has the same number of significant figures as the least precise number in your calculation. For example, in the solved problem 52.450 x 0.0023 / 1.06 = 0.113806604, the answer has two significant figures. You report it as 0.11.
- Mixed operations
- Do the calculations in steps (make sure you pay attention to the order of operations!) and evaluate the significant figures you can keep at each step. Then use these to determine the significant figures you report your final result to.
Pro tip: Do not round your values until the very last step to avoid introducing truncation errors into your calculated values.
Pro tip: Calculators are great at math but terrible at significant figures. Watch out for “sneaky” zeros that calculators remove when doing calculations, especially for addition and subtraction operations. You can always add zeros if you need additional significant figures beyond what the calculator gives you. (See the mixed-operation example below.)
Mixed Operation:
(0.761 + 0.429) / (214.081 – 2.58) = 0.005626451
(1.190) / (211.501) = 0.005626451
(three decimal places: [CA1] four sig figs) / (two decimal places: [CA2] five sig figs) = four sig figs in reported value
Report as 0.005626 or 5.626 x 10⁻³
About the Author

Amanda J. Carroll
is a Senior Lecturer and student chapter faculty advisor at Tennessee Tech University. She is also a member of the ACS Undergraduate Student Advisory Board.